File Lifecycle Management Analytics
Understanding File Lifecycle Management Analytics
Zadara VPSA provides the ability to collect data over the lifetime of files and report analytics by various parameters and perspectives. File lifecycle management analytics provide visibility into customer NAS environments, by delivering utilization and trend reporting capabilities, allowing insights into current usage of an environment’s resources and supporting future optimization. When File Lifecycle Index Management is enabled on a specific NAS share volume, the VPSA performs a single full scan of NAS share files. Subsequent filesystem changes are detected and updated in periodic indexing.
The available file lifecycle analytics reports:
File Lifecycle Analytics Report |
Report by |
|---|---|
Growth trends |
|
Capacity utilization |
|
The VPSA is preconfigured with file types, grouped into categories and identified by their filename extensions. Categories and recognized filename extensions can be customized. See Managing File Categories.
To enable the analytics reporting, the VPSA is configured to index file lifecycle data.
Note
Additional SSD volumes for the file lifecycle management’s indexing repository are allocated to the VPSA, to support its infrastructure. File lifecycle management indexing consumes some VPSA compute and memory resources.
File lifecycle management can be enabled on creation of a VPSA, or enabled later or disabled on existing VPSAs, via the Zadara Provisioning Portal. See Creating a VPSA for more details.
On VPSAs that are enabled for file lifecycle management, it is possible to pause or resume file lifecycle management globally, using the toggle in the File Lifecycle Management tab in the Settings page.
On VPSAs that are configured with file lifecycle management enabled, individual NAS share volumes can be created with file lifecycle indexing as enabled or disabled. At any time, a NAS share volume’s file lifecycle indexing can be enabled, paused, resumed or disabled. See Creating and Deleting a Volume and Volume File Lifecycle Management for more details.
Note
Disabling file lifecycle indexing for a volume removes all existing data collected for that volume.
Reporting File Lifecycle Analytics
The VPSA can display a large single report chart filling the full screen, or a user-selectable number of charts, up to three rows down by three across.

To report analytics of file lifecycles according to one or more of the available perspectives:
To choose the number of report panes on the screen, in the Analytics page under File Lifecycle Management, open the Layout combobox at the lower left.
At the top left of the report pane, select a specific volume or all volumes from the Report Scope combobox.
Click the File Analytics Report folder icon to expand and display available analytic reports. The most recent date and time that data collection (indexing) took place is displayed as Last update in the report header. Updates occur once every 24 hours.
Click and drag the selected report to the desired panel. From the Report Scope combobox on individual report panes, you can change the display to report analytics for a different volume or all volumes.
To switch between graphic and tabular report styles, at the top right of the report pane, click the Display combobox to choose one of the styles.
Note
Some reports offer display styles that are not available for other reports.
On graphic reports, mouse-over points of interest or shaded areas to display details of specific metrics.
Managing File Categories
The VPSA is preconfigured with file types, grouped into categories and identified by their filename extensions.
The File Categories page under File Lifecycle Management displays a table where each row is a file category and the list of filename extensions associated with that category. A filename extension can be associated with only one category. The analytics feature reports based on data collected per filename extension and its associated category.
File categories and filename extensions can be customized and configured.
After customizing file categories using the Create, Edit or Delete options, click Refresh to display the updated configuration in the File Categories table.
Note
Changes applied to file categories are reflected in analytics reporting after the next volume index cycle.
Creating a File Category
The VPSA supports a maximum of 12 categories of files. If there are already 12 categories, consider merging two categories by removing filename extensions from one category and adding them to another category, using the Edit option. Then, use the Delete option to remove the category that remained without any associated filename extensions.
In the top menu, click Create to add a new file category.
- In the Create Category dialog box, enter:
- Category Name: A meaningful name indicating the type of files
(based on the filename extensions) that are grouped together for association with the category.
- File Extensions: For each filename extension that will be
associated with the category, enter the extension and click Add. The file extension will be added to the File Extensions table below.
Click Submit to save the new file category.
Editing a File Category
To change the name of a file category or to add or delete filename extensions associated with a category:
Mark the category in the File Categories table by clicking on it.
In the top menu, click Edit.
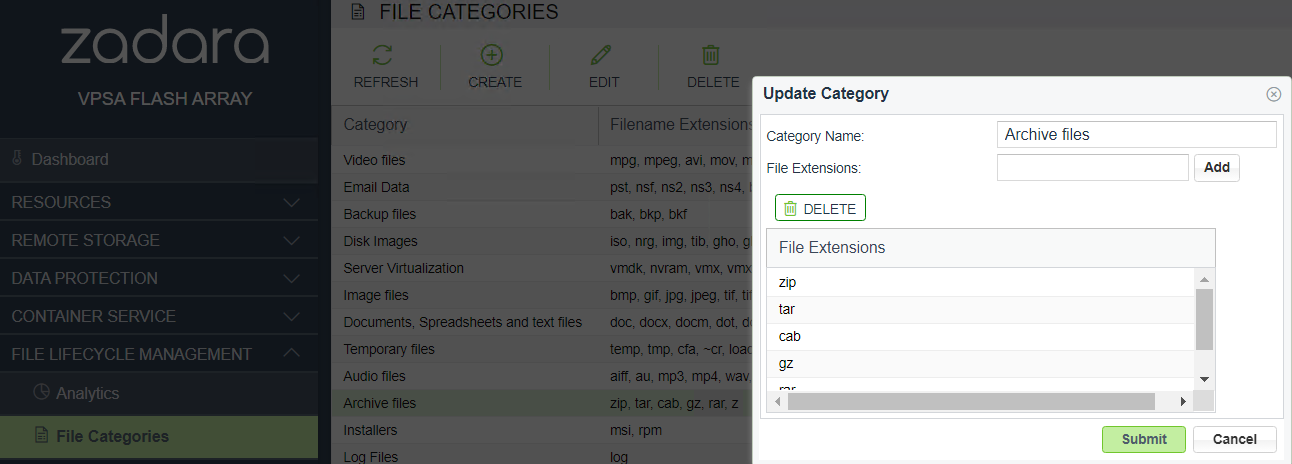
- In the Update Category dialog box:
To change the category’s name, edit the entry in the Category Name field.
For each new filename extension to associate with the category, in the the File Extensions field enter the extension and click Add. The file extension will be added to the File Extensions table below.
- To delete an associated file extension from the category:
Scroll the File Extensions table to locate the file extension to delete.
Mark the file extension row in the File Extensions table by clicking on it.
Click Delete above the File Extensions table.
Click Submit to save the updated file category.
Deleting a File Category
Deleting a file category will also remove all of the filename extensions associated with the category.
Note
To delete an individual filename extension from a category, follow the Editing a File Category procedure.
Mark the category in the File Categories table by clicking on it.
In the top menu, click Delete.
In the confirmation dialog box, confirm the deletion.