Users
A user can be created within Zadara Cloud Services as a member of a single account. To access and use Zadara Cloud Services, a user must be assigned to at least one project within that account via a Zadara Cloud Services role, and assigned at least one Zadara Cloud Services Policy.
Note
If a user is assigned to more than one project, the role assigned for each project must be the same.
To perform these operations, you need to be either the Zadara Admin user who can add users to any account, or a Tenant Admin user who can add users to the tenant account.
If a user originated from an Identity Provider and not from within Zadara Cloud Services, the only user action which can be performed is the management of their permissions.
None of these actions can be performed on the system ‘admin’ user of the cloud_admin account.
Creating Users
Navigate to the Identity & Access > Accounts view for the specific account for which you wish to create a user.
From the bottom half of the view, select the Users tab. This will display the currently defined users.
From the tab toolbar, click Create User.
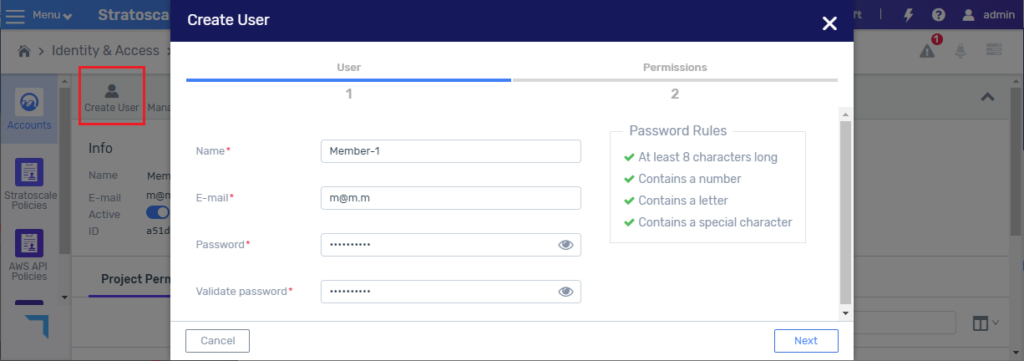
In the Create User dialog, enter the following information:
Name – enter a name. All names in an account must be unique. It is not case-sensitive.
E-mail – enter the user’s email address.
Password – enter a password. A valid password must satisfy the following currently defined rules:
Be at least 8 characters long.
Contain at least 1 number, 1 letter, and 1 special character.
When entering the password, the display on the right will dynamically indicate when each password rule has been satisfied.
Validate Password – re-enter the password.
Click Next. The Permissions tab displayed.
In the Add Project field, select a project from the pull-down list. You can select any project in the user’s account. You may also select multiple projects, one at a time.
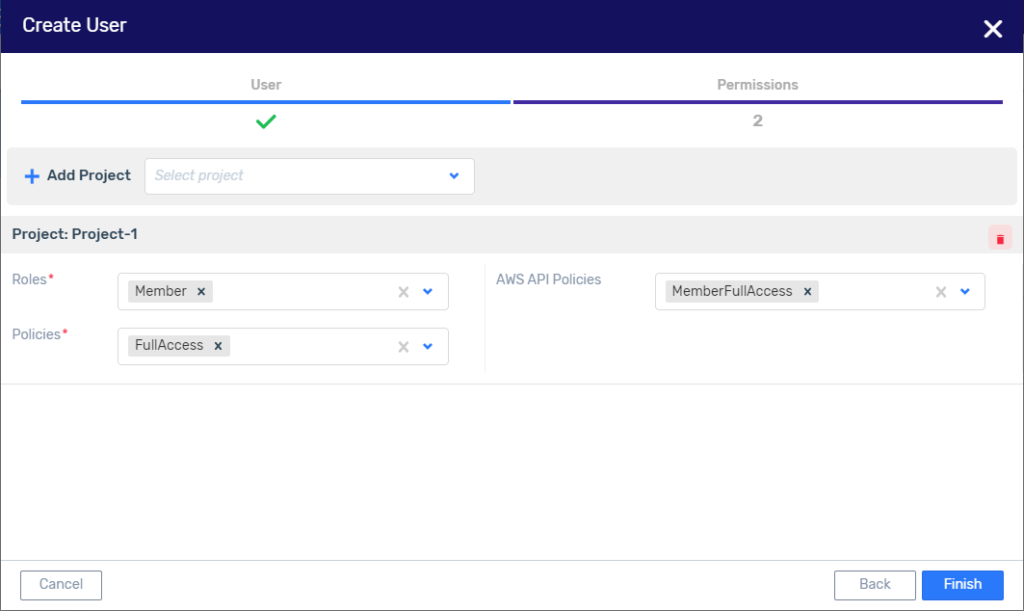
For each project added, enter the following information:
Roles - select one of the available roles: Member or Tenant Admin. This is required for the first project. Default role: Member.
Note
It is highly recommended not to assign multiple roles for the same user in a single project.
Policies - Select one or more Zadara Cloud Services Policies. The default ZCS policy is FullAccess. This policy grants full access to all of the functionality granted to this role prior to v5.3.4.
Note
Effective user and group permissions are determined by the intersection of the user’s and group’s assigned roles and policies.
For example, if a user is assigned the Tenant Admin role, and one of their Symp policies is ReadOnlyAdministrator, then the effective permission for that user would be read-only permission on all of the account’s resources and aspects.
AWS Policies - This field is optional and need only be populated if you want to grant access to AWS APIs.
To add a user to another project, click Add Project and enter the information above for the new project. To remove a project from the list, click the delete icon near the project name.
Click Finish to create the new user. The new user is created and is displayed in the Users tab of the specific account.
Deleting Users
When deleting a user, this user will no longer have access to Zadara Cloud Services. Deleting a user only removes the user from the system. It does not delete the virtual resources that this user created. These resources will still be accessible to all users with access to the projects for which these resources were created.
To delete a user:
Navigate to the Identity & Access > Accounts view.
From the bottom half of the view, select the Users tab. This will display the currently defined users.
Select the user to be deleted from the displayed list and click Delete from the tab toolbar. The Delete User confirmation notice appears.
Click OK. A message confirming the deletion of the user project will pop-up in the upper right-hand corner of the screen.
Managing Users Permissions
After a user is created, you can modify the user’s permissions and add/delete projects assigned to the user.
To manage the permissions of a user:
Navigate to the Identity & Access > Accounts view.
From the bottom half of the view, select the Users tab. This will display the currently defined users.
Select the user whose permissions are to be modified from the displayed list and click Manage Permissions from the tab toolbar. The Manage Permissions for User: <name of selected user> dialog box is displayed.
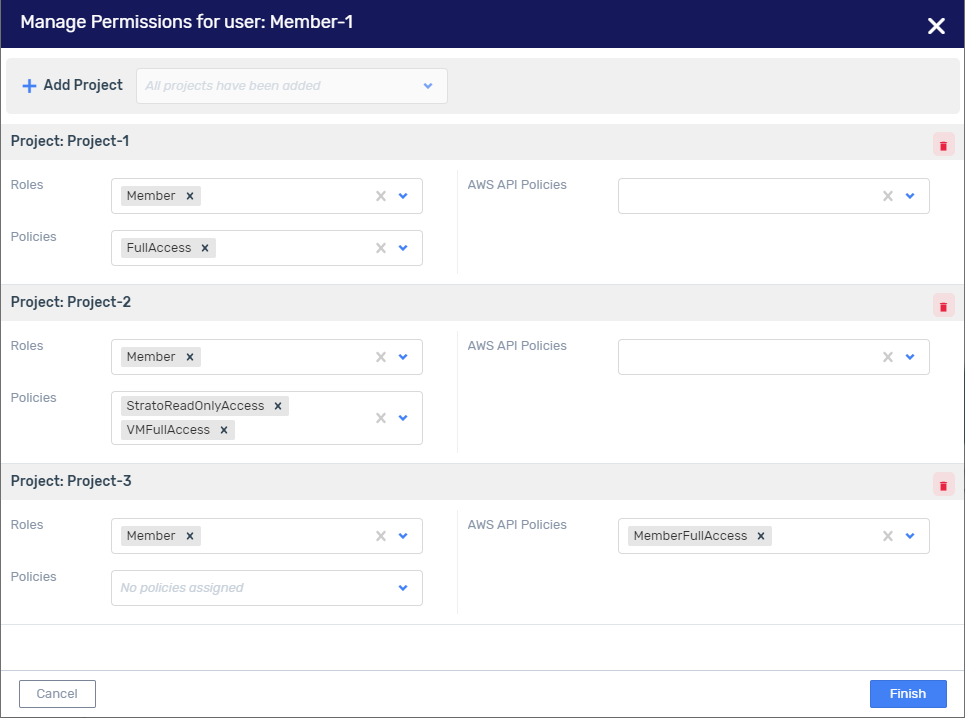
In the Add Project field, select a project from the pull-down list. The following permissions may be modified.
Roles
Policies
AWS API policies
To modify permissions for another project, click Add Project and enter the information above for the new project. To remove a project from the list, click the delete icon near the project name.
Click Finish to save the modified permissions.
Modifying Users
After creating a user, you can modify its name, email address and password expiration status.
Navigate to the Identity & Access > Accounts view.
From the bottom half of the view, select the Users tab. This will display the currently defined users.
Select the user to be modified from the displayed list and click Modify from the tab toolbar. The Modify User dialog box is displayed.
The following may be modified:
Name
Email Address
Password Expiration - Enable/Disable
Click Finish. A message confirming the updating of the user will pop-up in the upper right-hand corner of the screen.
Resetting User Passwords
Once a user is created, the password can be reset by the Tenant Admin user of the user’s account.
Note
The password of users in accounts connected to an Identity Provider service, cannot be reset from within Zadara Cloud Services.
To reset a user password:
Navigate to the Identity & Access > Accounts view.
From the bottom half of the view, select the Users tab. This will display the currently defined users.
Select the user whose password is to be modified from the displayed list and click Set Password from the tab toolbar. The Set Password dialog box is displayed.
Enter the following:
Password
Validate Password - re-enter the same password.
Click OK. A message confirming the successful resetting of the password will pop-up in the upper right-hand corner of the screen.