Virtual Private Cloud (VPC)
VPC Introduction
The Virtual Private Cloud (VPC) is a networking resource with a logical router at its core. Within Zadara Cloud Services, it was designed to provide a user experience that is identical to the AWS VPC. The virtual private cloud provides a routed L3 environment into which the user can deploy instances and managed services.
When you create a VPC you specify a CIDR block. All subnets that you will create in the VPC will be carved out from this CIDR block (without overlap). The router will ensure IP connectivity between all these subnets.
You can create a VPC with the UI either using a wizard which helps select the required networking depending on the VPC type, or with a basic Create command. The following VPC types are supported:
VPC with Single Private Subnet - the VPC runs in an isolated section of the cloud, without access to the Internet.
VPC with Single Public Subnet - the VPC runs in an isolated section of the cloud with direct access to the Internet. Security groups can be used to control inbound and outbound network traffic.
VPC with Public and Private Subnets - VM instances within the private subnet in the VPC can establish outbound connections to the Internet via the public subnet using Network Address Translation (NAT).
Default VPC
Every VPC-provisioned project has a Default VPC that is automatically created by Zadara Cloud Services.
The Default VPC has 172.31.0.0/16 set as its CIDR block.
It also contains a single subnet with 172.31.0.0/20 as its CIDR.
The VPC has an Internet Gateway that connects it to the external network that was selected by the project.
The route table of the subnet has a local route for the CIDR block of the VPC and a default route to the Internet gateway.
A default security group is created that allows inbound traffic from all the virtual interfaces to which it is applied and allows outbound traffic to any destination.
A DHCP-options set is also defined with the the domain-name option set to DHCP local.
In a regular VPC subnet, the subnet’s IP gateway is always the first valid IP address in the subnet CIDR. For example, 172.31.0.1 is the IP gateway of the default subnet in the Default VPC.
In a VPC direct subnet, the subnet’s external IP gateway must be provided by the user, and is excluded from the subnet’s allocation pool.
The VPC internal router IP is the subnet gateway which attaches it to the VPC route table. This IP address must also be provided by the user, and is also excluded from the subnet’s allocation pool.
The standard setup is to set the VPC internal router IP to the first IP address in the subnet CIDR, for example, 10.10.10.1. The subnet’s allocation pool starts with the second IP address, for example, 10.10.10.2.
DHCP server addresses are always allocated as the two lowest IP addresses in the subnet’s allocation pool, excluding the subnet’s IP gateway. For example, 172.31.0.1 is the IP gateway of the default subnet in the Default VPC, and 172.31.0.2 and 172.31.0.3 are the DHCP server addresses.
How VPC passes DNS Servers via DHCP
When VPC DNS is enabled, the VPC DHCP service provides VMs with a pair of internal IPs as DNS servers. The VPC DNS service will look up any local zone records internally, and it will forward queries to the DNS servers provided in the DHCP Option Set for all external domains.
When VPC DNS is disabled, the VPC DHCP service provides VMs with the exact IPs of the DNS servers configured in the DHCP Option Set. In this case, DNS requests will go directly from VMs to the external DNS nameservers.
Creating a VPC
Creating a VPC with the UI Wizard: A simplified lead-through that creates a VPC and all the resources that the VPC needs, as a ready-to-use network.
Creating a VPC with the UI VPC Create option: An interface for advanced users to create a VPC.
See the video demonstrating the basics of creating and configuring zCompute VPCs:
zCompute provides two options in the UI for creating a VPC:
Creating a VPC with the UI Wizard
To create a VPC using the wizard:
Navigate to the Networking > VPC view.
From the top toolbar, click Wizard.
In the VPC Wizard dialog’s Configuration tab, select one of the following VPC types. Subsequent UI options will depend on this selection.
VPC with Single Private Subnet
VPC with Single Public Subnet
VPC with Public and Private Subnets
Click Next.
For VPC with Single Private Subnet, proceed as follows:
In the VPC tab, enter the following:
VPC Name
VPC Description
CIDR
Click Next.
In the Private Subnet tab, enter the following:
Private Subnet Name
Private Subnet Description
CIDR - This CIDR must be within the CIDR defined for VPC.
Click Finish.
For VPC with Single Public Subnet, proceed as follows:
In the VPC tab, enter the following:
VPC Name
VPC Description
CIDR
Internet Gateway Name
Click Next.
In the Public Subnet tab, enter the following:
Public Subnet Name
Public Subnet Description
CIDR - This CIDR must be within the CIDR defined for VPC.
Click Finish.
For VPC with Public and Private Subnets, proceed as follows:
In the VPC tab, enter the following:
VPC Name
VPC Description
CIDR
Internet Gateway Name
Click Next.
In the Private Subnet tab, enter the following:
Private Subnet Name
Private Subnet Description
CIDR - This CIDR must be within the CIDR defined for VPC.
Click Next.
In the Public Subnet tab, enter the following:
Public Subnet Name
Public Subnet Description
CIDR - This CIDR must be within the CIDR defined for VPC, but different than that defined for private subnet.
Click Next.
In the NAT Gateway tab, enter the following:
NAT Gateway Name
NAT Gateway Description
Elastic IP
Click Finish.
Creating a VPC with the UI VPC Create option
To create a VPC using the UI VPC Create option:
Navigate to the Networking > VPC view.
From the top toolbar, click Create.
In the Create VPC dialog, enter the following:
Name - name of the VPC.
Description - description of the VPC.
CIDR - subnet associated with the VPC.
Internet Gateway - internet gateway associated with VPC.
Note
An existing internet gateway will only be available from the pull-down list for association with a VPC if it is not already associated with another VPC. In this case, a new internet gateway should be defined by clicking +.
Other constructs such as additional subnets, NAT Gateway, or Elastic IP’s can be associated with the VPC separately with the appropriate networking UI option.
VPC Operations
After creation of a VPC, it will be displayed in the vpc list in the Networking > VPC view. The following operations can be performed by selecting a VPC from the list, and clicking the appropriate icon.
Top Toolbar Operations
Modify - the following settings can be updated:
Name - name of the VPC.
Description - description of the VPC.
DNS enabled - checkbox to enable or disable the DNS.
Service VM Subnet - dropdown list of available subnets, or the option to create and assign a new subnet.
Attach DHCP Options
Detach DHCP Options
Peer VPC - Create a Peering Connection to the VPC.
Set Default - set the VPC as the default for given project.
Upgrade DNS - DNS is a system level service. When upgraded to a new version, all related VM instances must be restarted. This requires user confirmation using this option.
Delete - delete the VPC and its configurations.
Lower Toolbar Operations
Events - view configuration events (info) or alarms for the VPC.
Peers - view peering information for the VPC.
Subnets - view subnet information for the VPC.
Security Groups - view security group information for the VPC.
Route Tables - view route table information for the VPC.
Internet Gateways - view internet gateway information for the VPC.
DNS Records - view DNS information for the VPC.
VMs - view VM instance information for the VPC.
View VPC DNS Status
When DNS is enabled, in the VPC Networking > VPC > <VPC name> view, the DNS VM Status and DNS Health information are displayed in the DNS section.
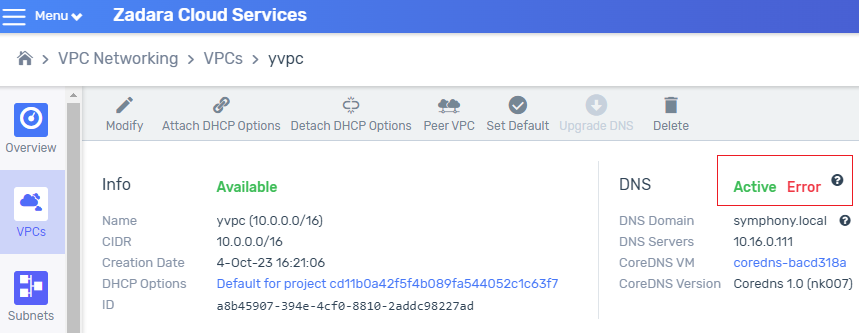
When the DNS service is degraded, a context-sensitive tooltip appears to the right of DNS Health.
Note
The DNS VM Status is checked once per minute returning the DNS Health, except during DNS service actions, when the DNS VM Status check is skipped.
The DNS VM Status can be one of the following:
DNS VM Status |
DNS Health |
|---|---|
Active |
Possible values:
|
Pending |
Unknown |
Processing |
Unknown |
Deleting |
Unknown |
Error |
Error |
When the DNS Health check detects a degraded service, it indicates the possible cause and resolution. The cause and resolution can be viewed in context, by clicking the tooltip icon to the right of DNS Health.
DNS Health |
Description |
Resolution / actions |
|---|---|---|
Healthy |
The DNS service is functioning successfully. |
|
No Resolution |
The provided DNS was not able to resolve a test query. |
Check the name server provided by the DHCP options and make sure it can resolve known public names, or open a support ticket if a name server was not provided in the DHCP options. |
Unreachable |
The provided DNS name server was not reachable. |
Check the DNS name server provided by the DHCP options and make sure it can resolve known public names, or open a support ticket if a name server was not provided in the DHCP options. |
Unknown |
The DNS service state is unknown. |
Probably the service is starting up. If the problem persists after 5 minutes, open a support ticket. |
Error |
An error has been detected. |
Try to disable DNS in the VPC settings, save, wait for the changes to apply, and re-enable. If the problem persists after 5 minutes, open a support ticket. |